Thursday, April 2, 2020

Godown Wiring Practical

GODOWN WIRING

Godown wiring circuit is needed in tunnel like structures, warehouses, long passages, big godowns having lots of rooms and different portions.

Let us discuss how to make Godown wiring in detail.


Requirements:


  •   MCB                 230V,5A                  1 No's
  •   1-way switch    SPST (230V, 5A)    1 No's 
  •   2-way switch    SPST (230V, 5A)    2 No's
  •   Light Bulb           40W                      3 No's
  •  Wire Size           1.2 mm PVC           2 No's


 Procedure:

  • First of all, turn off the main breaker to ensure the main supply is switched OFF.
  • Connect all the switches to the earthing / grounding terminals (not shown in the fig)
  • Connect the Neutral wire from MCB directly to all the three lamps as shown in fig.
  • Connect the Line (Phase or Live) wire to the first terminal of SPST switch.
  • Connect the first SPDT switch common (middle) terminal to the second terminal of SPST switch.
  • Connect the upper terminal of first SPDT switch to the first lamp.
  • Connect the lower terminal of first SPDT switch to the common (middle one) of second SPDT switch.
  • Connect the upper and lower terminals of second SPDT switch to the second and third lamps respectively.
 Circuit Diagram
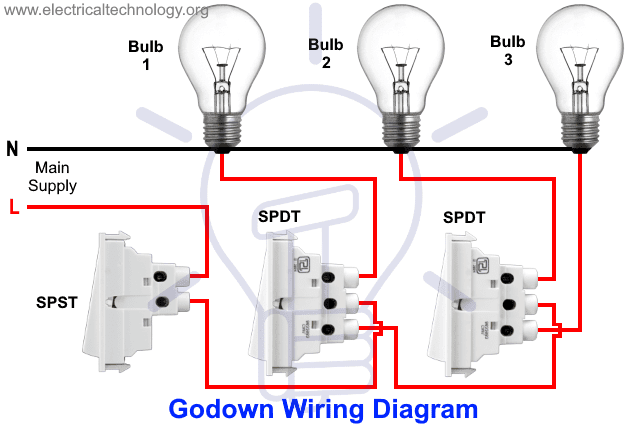
                            
                                   Godown Wiring Circuit

Working:


    • When switch ON the SPST, the first lamp switch ON.

    • When switch ON the first SPDT, the second lamp switch ON and the previous one switch OFF.

    • When switch ON the second SPDT, the third lamp switch ON and the previous (second one) lamp switch OFF.

    Similarly,
          
           Switch OFF the last i.e. second SPDT, the second lamp switch ON and third lamp switch OFF and so on until he reaches to the first SPST switch and the whole circuit can be switch OFF by turning it OFF.
                                     
    Animated Working 
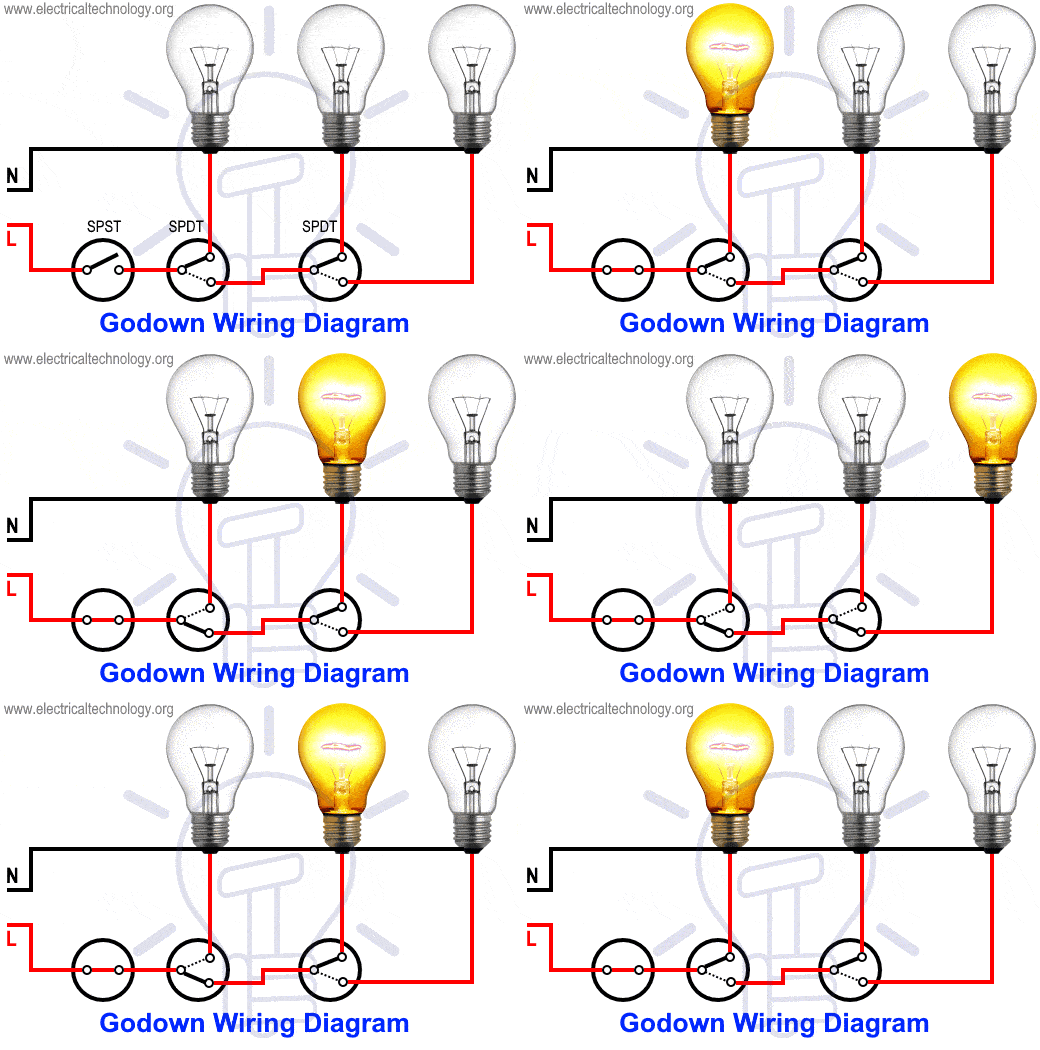
                                 Godown Wiring Diagram Circuit and Working
    Advantages
    • It saves energy as only one load point is turned ON at a time.
    • The previous light bulb will switch off when turn on the next one.
    • It can save the power as well as time.
    Disadvantages

    • Two or more lighting points can’t be turn on at once.
    • It is a complicated wiring

    Application of Wiring

    STAIRCASE WIRING

    Stair Case Wiring is a term used to denote, where a single lights controlled from Various Places. A Stair Case wiring can be used only for human comfort.

    Let us discuss how to make staircase wiring in detail.

    Requirements:

    • Two Way Switch – 5A, 230 V – 2 NOS
    • Lamp – 40 W – 1 NO
    • Connecting Wires – as required. 
    • Tester – 500V – 1NO
    • Wire Stripper – 150mm – 1 NO
    • Screw Driver – 150mm – 1 NO
      

     Procedure: 

    1. Mark switch and bulb location points and draw lines for wiring on the wooden   Board.

    2. Place wires along the lines and fix them with the help of clips. 

    3. Fix the two-way switches and bulb holder in the marked position on the wooden Board. 

    4. Complete the wiring as per the wiring diagram.

    5.Test the working of the bulbs by giving electric supply to the circuit.


    Circuit Diagram

                                                   2 Way Light Switch diagram in engilsh |2 Way Light Switch Wiring ...
                                            
     Here the connections are done straight (1-1, 2-2) on the Switch 1 and Switch 2.


    Working: 

     Sr. No
    Position-S1
    Position-S2
    Condition of Lamp
    1
    1
    1
    BRIGHT
    2
    1
    2
    DARK
    3
    2
    2
    BRIGHT
    4
    2
    1
    DARK


     Advantages of Using Staircase Wiring: 

    • Easy to control appliances from various points.
    • Faster control than a single switch.
    • Highly Efficient for larger places.
    • Living Comfort can be increased.
    • Electricity can be saved.
    General example of Staircase wiring

                                     Staircase Wiring Circuit Diagram - How to Control a lamp from 2 ...